Wii Nunchuk as a USB HID controller
TL;DR <
You can find the source code here.
I used the Wii Nunchuk controller to prototype one handed controller for creating computer graphics. I used the Blue Pill board which carries a STM32F1 microcontroller with a built-in USB peripheral. That allowed me to implement it as a true USB HID (Human Interface Device) for the Windows OS.
The results were disappointing. My USB HID implementation was poor. I have fixed several important bugs in another project.
Reasoning <
Most of the projects in which I build controllers come from the same place - the friction of using computer as a tool, especially for art creation.
Years ago I got hooked on computer graphics. I’m amazed what people create everyday. The amount of different programs and ideas they bring to the table is stunning.
I find myself disappointment in the hardware. If you work with computer graphics you
usually use a graphics tablet. You use the tablet’s pen with one hand while the
other lays on the keyboard. That’s because in order to work efficiently you have
to use hotkeys.
Well customised set of hotkeys makes you faster and makes it easier to focus on art.
The problem is that there is a limit to what you can do with a keyboard.
It will always require some sort of gymnastics since you can’t escape
those CTRL + SHIFT + ALT + P combos. That adds friction. You pause for a second
sometimes to remember the hotkey, sometimes to just look at the keyboard.
My experience is that when I get in the zone I can spend hours creating with just several tools and several additional utilities/commands. What if I could have those under my finger tips all the time? What if they require minimal effort? Why would I use a key combination for something I’m using once every minute? What if 95% of the time spent creating could be friction free?
No software delivers a convenient set of keyboard shortcuts. I would also argue that keyboard is very limiting. It’s a tool which is good for everything but great at nothing. There are controllers that try other ways of interaction but I don’t think anything stands out. I want to explore this space with my own ideas.
So what did I do…? <
I wanted to move the hand from the keyboard onto a controller which would give the user an analog like control (stick in this case) combined with only a few buttons. Wii Nunchuk controller seemed like a good base for experimentation.
Since I use those projects to learn I’ve also decided that it’s a perfect moment to try to make a USB Human Interface Device. USB interface is wide spread and well… universal. Considering my interests it seemed like a no-brainer: I must learn how to make USB devices from ground up.
That entails:
- Building the device itself.
- Writing a USB device firmware.
- Writing a USB driver for the targeted OS.
Building the device <
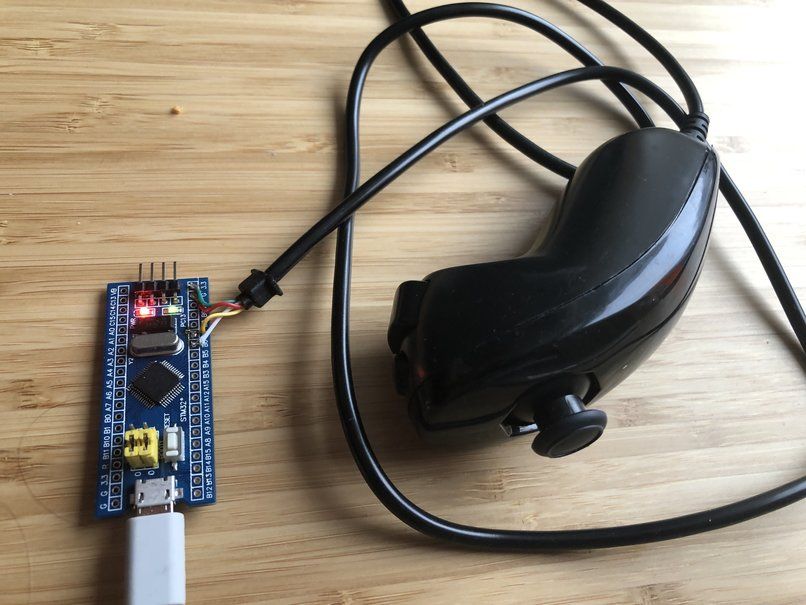
I found the Wii Nunchuk is a great one-handed controller. It only has 1 stick and 2 buttons. Everything is under you fingertips. It uses I2C to communicate with the Wii console, and it’s are well documented. Building the device might be a bit of a stretch. Maybe next time.
I soldered the Wii Nunchuk cables to the I2C pins of the Blue Pill board. The board rocks the STM32F103C8 microcontroller. The boards are super cheap for something with a hardware USB peripheral. Wonderful, lets buy 5!
Unfortunately those boards have some flaws, i.e. the resistors for the USB lines are of wrong values. I resoldered them to the proper 1.5kΩ ones.
Writing a USB device firmware <
There are numerous choices when it comes to choosing framework for the firmware. I chose libopencm3. It’s open-source, community developed library which supports many Cortex-M microcontrollers.
I chose it not only because it’s open-source. The major advantage for me is that it’s light. The layer between the library and the actual registers operations is thin. I like using minimal amount of abstraction.
The firmware itself implements:
- USB HID 1 - that means that the device
descriptor doesn’t implement parameters:
bDeviceClass,bDeviceSubClassandbDeviceProtocol. Those are implemented in the Interface descriptor. - HID report descriptor - it uses a custom HID report descriptor which describes two stick axes and two buttons.
- Device, Interface, Endpoint descriptor - one of each. Keeping it simple.
- Wii Nunchuk communication - communicates through I2C.
Simplified steps the code takes:
- Initialises the clocks, SysTick exception and peripherals (I2C and USB).
- Polls USB requests and responds with USB descriptors.
- Configures the Wii Nunchuk for communication without encryption and reads its ID to confirm communication works.
- Polls the USB bus continuously.
- Polls the Wii Nunchuk for data and pushes the data into USB endpoint buffer in SysTick exception.
Here is a stripped down version. You can find the full source code here.
internal enum usbd_request_return_codes
hid_control_request(usbd_device *dev,
                    struct usb_setup_data *req,
                    uint8_t **buf, uint16_t *len,
                    void (**complete)(usbd_device *dev, struct usb_setup_data *req))
{
  (void)complete;
  (void)dev;

  if((req->bmRequestType != 0x81) ||
     (req->bRequest != USB_REQ_GET_DESCRIPTOR) ||
     (req->wValue != 0x2200))
    return USBD_REQ_NOTSUPP;

  *buf = (uint8_t *)hid_report_descriptor;
  *len = sizeof(hid_report_descriptor);

  usb_state = USB_INITILIZED;
  systick_counter_enable();

  return USBD_REQ_HANDLED;
}


int main(void)
{
  rcc_clock_setup_in_hse_8mhz_out_72mhz();

  rcc_periph_clock_enable(RCC_GPIOA);
  rcc_periph_clock_enable(RCC_GPIOB);
  rcc_periph_clock_enable(RCC_GPIOC);
  rcc_periph_clock_enable(RCC_I2C1);

  systick_set_clocksource(STK_CSR_CLKSOURCE_AHB_DIV8);
  // SysTick interrupt every N clock pulses: set reload to N-1
  // 72MHz / 8 = 9MHz
  // 9000000Hz / 90000 = 100Hz
  systick_set_reload(89999);
  systick_interrupt_enable();

  ////////////////////////
  //
  //  I2C1 (PB6, PB7)
  //
  //  STM32F1 uses i2c_common_v1.h

  i2c_reset(I2C1);
  i2c_peripheral_disable(I2C1);
  gpio_set_mode(GPIOB,
                GPIO_MODE_OUTPUT_10_MHZ, GPIO_CNF_OUTPUT_ALTFN_OPENDRAIN,
                GPIO6 | GPIO7);

  i2c_set_speed(I2C1, i2c_speed_sm_100k, 8);
  i2c_peripheral_enable(I2C1);

  //
  //  I2C - end
  //
  ////////////////////////

  ////////////////////////
  //
  //  USB (PA12 - D+, PA11 - D-)
  //

  /*
   * This is a somewhat common cheap hack to trigger device re-enumeration
   * on startup.  Assuming a fixed external pullup on D+, (For USB-FS)
   * setting the pin to output, and driving it explicitly low effectively
   * "removes" the pullup.  The subsequent USB init will "take over" the
   * pin, and it will appear as a proper pullup to the host.
   * The magic delay is somewhat arbitrary, no guarantees on USBIF
   * compliance here, but "it works" in most places.
   */
  gpio_set_mode(GPIOA, GPIO_MODE_OUTPUT_2_MHZ, GPIO_CNF_OUTPUT_PUSHPULL, GPIO12);
  gpio_clear(GPIOA, GPIO12);
  for (uint32_t i = 0; i < 0x800000; i++)
  {
    __asm__("nop");
  }

  usbd_dev = usbd_init(&st_usbfs_v1_usb_driver,
                       &dev_descr,
                       &config, usb_strings, 3, usbd_control_buffer,
                       sizeof(usbd_control_buffer));
  usbd_register_set_config_callback(usbd_dev, hid_set_config);

  //
  //  USB - end
  //
  ////////////////////////

  while (1)
  {
    usbd_poll(usbd_dev);
  }
}

// This is enabled in hid_control_request()
void sys_tick_handler(void)
{
  uint8_t buf[3] = {0, 0, 0};
  buf[0] = controller.stick_X;
  buf[1] = controller.stick_Y;
  buf[2] = controller.buttons;

  usbd_ep_write_packet(usbd_dev, 0x81, buf, 3);

  if (controller.state == CTRLR_UNINITILIZED)
  {
    // Init without encryption.
    controller.buf_out[0] = 0xF0;
    controller.buf_out[1] = 0x55;
    i2c_transfer7(I2C1, WII_NUNCHUK_ADDR, controller.buf_out, 2, NULL, 0);
    controller.buf_out[0] = 0xFB;
    controller.buf_out[1] = 0x00;
    i2c_transfer7(I2C1, WII_NUNCHUK_ADDR, controller.buf_out, 2, NULL, 0);
    controller.state = CTRLR_INITILIZED;
  }
  else if (controller.state == CTRLR_INITILIZED)
  {
    controller.buf_out[0] = 0xFA;
    i2c_transfer7(I2C1, WII_NUNCHUK_ADDR, controller.buf_out, 1, NULL, 0);
    i2c_transfer7(I2C1, WII_NUNCHUK_ADDR, NULL, 0, controller.buf_in, 4);

    if (memcmp(controller.buf_in, WII_NUNCHUK_ID, 4) == 0)
      controller.state = CTRLR_PRESENT;
  }
  else if (controller.state == CTRLR_PRESENT)
  {
    controller.buf_out[0] = 0x0;
    i2c_transfer7(I2C1, WII_NUNCHUK_ADDR, controller.buf_out, 1, NULL, 0);
    i2c_transfer7(I2C1, WII_NUNCHUK_ADDR, NULL, 0, controller.buf_in, 6);
    controller.stick_X = controller.buf_in[0];
    controller.stick_Y = controller.buf_in[1];
    controller.buttons = controller.buf_in[5] &
      (WII_NUNCHUK_C_BTN_MASK | WII_NUNCHUK_Z_BTN_MASK);
  }
}
The biggest challenge was to synchronize the USB configuration/enumeration with the SysTick exception. In the end, a solution that reliably worked is the one you see above. The SysTick gets initialized but not turned on until the function responsible for handling the USB control requests fires.
After the SysTick has been enabled it starts configuring the Wii Nunchuk controller.
The state of the controller is being tracked and when it reaches the CTRLR_PRESENT
state it starts polling for the actual controller readings.
I do not like this solution. It adds unnecessary complexity. Without this solution the SysTick interrupted the USB enumartion. That resulted in a failure in installing the device drivers.
At the time of working on this project I had no hardware to observe the timings. I will revisit this problem in the next USB device project.
Writing a USB driver for the host OS - Windows <
This part of the project was something new to me. The main goal of this project was to test the controller for computer graphic apps, like: Blender, ZBrush and Photoshop. Since two of those programs don’t work on Linux, a platform I’m more familiar with, I had to implement the driver for Windows.
I still find the different APIs, Microsoft provides, confusing. There are several USB drivers 2. You can go for a kernel-space driver or a user-mode application.
Depending which way you want to go your goal is to design your device in such a way that Windows installs a specific driver. It might be the the WinUSB driver 3. It is a more generic USB driver. From Microsoft’s documentation 4:
Windows USB (WinUSB) is a generic driver for USB devices that was developed concurrently with the Windows Driver Frameworks (WDF) for Windows XP with SP2. The WinUSB architecture consists of a kernel-mode driver (Winusb.sys) and a user-mode dynamic link library (Winusb.dll) that exposes WinUSB functions. By using these functions, you can manage USB devices with user-mode software.
In order to use this driver you have to write an INF file that tells Windows that this device (identified by VID and PID) should use the WinUSB driver. You can also do that by adding specific String descriptors to your device firmware. I considered going the WinUSB driver but there is a simpler way.
Windows groups specific devices as a Human Interface Devices (HID). Concept of the HID is wider in Windows than it is in the USB specification. In Windows you communicate with the device through an abstraction called HID Collection 5. This abstraction isn’t limited to USB devices.
I’ve read the HID Collections documentation and started implementing a user-mode code that would handle communication with my controller. Unfortunately the documentation isn’t good. I feel I’ve made a good progress but the process of writing the driver became exhausting.
I’ve started looking into libraries that could make it faster. Two libraries stick out:
- libusb - the most popular library for handling USB devices. I would have went with that one but its documentation encourages to use something else for HID, and that is…
- hidapi - this little fella. It’s a multi-platform, pretty well documented and has an examples on how to open a device based on VID and PID. The only thing that worried me was that it hasn’t been updated in more than 3 years.
I’ve decided to give hidapi a try. The repository contains a Visual Studio solution. In order to build it I had to retarget the project for Windows 10 and turn off the Spectre Protection in the projects settings. After doing that I had the x86 and x64 hidapi built and ready.
Before I talk about the code itself I would like to describe how I build it. I do not enjoy using Visual Studio. Nowadays it’s bloated and the only part of it that is useful is the debugger. Fortunately Casey Muratori shows how to develop in Windows environment without Visual Studio, except when debugging.
In order to be able to do that I first use the vcvarsall.bat script to add
the compiler to the path:
@echo off
call "C:\Program Files (x86)\Microsoft Visual Studio\2017\Community\VC\Auxiliary\Build\vcvarsall.bat" x64
That’s my set_environment.bat script.
I don’t see a reason to use build systems. I include the source files into the
main.cpp file a compile one binary from that. The most basic build script in
that case looks as follows:
@echo off

mkdir build
pushd build
cl /Zi ..\src\main.cpp /I "..\hidapi" /link /LIBPATH:"..\hidapi\MS64" User32.lib hidapi.lib
popd
It’s simple and results in a very short compile times.
Below I’ve pasted the most important part of the source code. I’ve stripped it so it’s easier to read.
#define VID     0x0079
#define PID     0x0011

static LARGE_INTEGER frequency;

int main(int argc, char* argv[])
{
  QueryPerformanceFrequency(&frequency);

  int result;
  hid_device* usb_handle;

  if (hid_init())
    return -1;

  unsigned char usb_data_buffer[256];

  // Open the device using the VID, PID,
  // and optionally the Serial number.
  usb_handle = hid_open(VID, PID, NULL);
  if (!usb_handle) {
    printf(" >> Unable to open device\n");
    return 1;
  }

  print_usb_info(usb_handle);
  // No point in nonblocking reading.
  hid_set_nonblocking(usb_handle, 0);

  hid_read(usb_handle, usb_data_buffer, sizeof(usb_data_buffer));
  drop_controller_data(&controller, usb_data_buffer);
  controller.stick_dir_prev = controller.stick_dir;
  controller.btn_C_prev = controller.btn_C;
  controller.btn_Z_prev = controller.btn_Z;

  // Map buttons to stick positions and buttons.
  controller_map.dir_N = 0x41;
  controller_map.dir_NE =0x42;
  controller_map.dir_E = 0x43;
  controller_map.dir_SE = 0x44;
  controller_map.dir_S = 0x45;
  controller_map.dir_SW = 0x46;
  controller_map.dir_W = 0x47;
  controller_map.dir_NW = 0x48;
  controller_map.btn_C = VK_CONTROL;
  controller_map.btn_Z = 0;

  while (running) {
    LARGE_INTEGER counter_loop_start;
    LARGE_INTEGER counter_loop_end;
    LARGE_INTEGER counter_usb_poll_start;
    LARGE_INTEGER counter_usb_poll_end;

    QueryPerformanceCounter(&counter_loop_start);

    QueryPerformanceCounter(&counter_usb_poll_start);
    result = hid_read(usb_handle, usb_data_buffer, sizeof(usb_data_buffer));
    if (result == 0)
      printf(" >> waiting...\n");
    if (result < 0)
      printf(" >> Unable to read()\n");
    QueryPerformanceCounter(&counter_usb_poll_end);

    drop_controller_data(&controller, usb_data_buffer);

    MOUSEINPUT mouseInput = {};
    mouseInput.dwFlags = MOUSEEVENTF_MOVE;
    INPUT mInput;
    mInput.type = 0;

    KEYBDINPUT keybdInput[5] = {0};
    INPUT kInput[5] = {0};
    kInput[0].type = 1;
    kInput[1].type = 1;
    kInput[2].type = 1;
    kInput[3].type = 1;
    kInput[4].type = 1;

    uint8_t sent_events = 0;

    if (translate_controller(&mouseInput, keybdInput, &controller, STICK_KEYBD))
    {
      mInput.mi = mouseInput;
      sent_events = SendInput(1, &mInput, sizeof(INPUT));
      kInput[0].ki = keybdInput[0];
      kInput[1].ki = keybdInput[1];
      kInput[2].ki = keybdInput[2];
      kInput[3].ki = keybdInput[3];
      kInput[4].ki = keybdInput[4];
      sent_events += SendInput(5, kInput, sizeof(INPUT));
    };

    controller.stick_dir_prev = controller.stick_dir;
    controller.btn_C_prev = controller.btn_C;

    QueryPerformanceCounter(&counter_loop_end);
    int measurement_1 = (1000000 * (counter_loop_end.QuadPart - counter_loop_start.QuadPart)/frequency.QuadPart);
    int measurement_2 = (1000000 * (counter_usb_poll_end.QuadPart - counter_usb_poll_start.QuadPart)/frequency.QuadPart);
  }

  hid_close(usb_handle);
  hid_exit();

  return 0;
}
As you can see I’ve used only several hidapi functions. The rest of the code
is translating the controller readings and using it as OS’es input. In Windows
you can send input commands using SendInput function 6.
It uses the INPUT structure as an argument. This structure wraps the MOUSEINPUT
or the KEYBDINPUT. It’s either or because the field in INPUT structure for
those is a union 7.
At an early point in writing this code the while I put the while loop to sleep
for a brief moment between each iteration. I did it because I assumed that the
USB polling should be pretty fast… What I’ve experienced was a several seconds
lag in response… That makes any controller useless.
I felt it’s obvious that Windows can poll the USB more often than 100Hz. Science
needs proof though. I’ve started collecting timing information using
QueryPerformanceCounter. With sleep function the results were horrible.
I’ve removed the sleep function and started logging the timing information into
a file.
The results varied but I wanted to get some real numbers. I’ve set up a PipEnv Python environment with pandas library and wrote a short script that computes the mean and standard deviation of a single loop iteration.
 --- Full loop timing
Mean : 9925.3021 us
Std deviation : 3578.1599 us

 --- USB poll timing
Mean : 8283.3872 us
Std deviation : 2845.9547 us

 --- (USB poll)/(LOOP)
Mean : 0.8346
Mean value for one loop iteration reaches 10ms and that would be fine if not for the standard deviation of 3.5ms… yikes. That means it doesn’t hit the 100Hz mark without any process sleeping. Also worth pointing out that the USB polling takes almost 83.5% of the time.
It’s hard for me to reason if those numbers are good or bad. Polling an input device 100 times every seconds seems reasonable for a good user experience. I’m not sure how much faster can it get in the user-mode application like that. During the development I’ve used WireShark to sniff the USB communication. I know the OS starts communication with the device as soon as it gets connected. Does it stop flooding the device with requests if my app opens the device or is my app and OS competing for the device’s attention and that could impact the poll timing? A question for another day.
At this point the communication worked well and I could focus on the next part which is…
Input experimentation <
I had several ideas for the actual usage of the controller. I wanted to explore three of those ideas.
The binary layout <
What I mean by binary layout is a a control scheme in which each direction of the stick corresponds to a button press. You push the stick up and it sends a button mapped to this direction. This seemed like the easiest one to implement.
Implementation was easy. By comparing controller state from the previous poll and the current one I could recognize the state change. I’ve enumerated the directions and added a deadzone. As long as the stick remained in the deadzone, its state was neutral. Crossing from a neutral state to one of the directions triggered a key press.
The disappointment <
I wanted to be able to get at least 8 directions from the stick. Those have to be reliable. That means that using diagonal direction gets you a clean output binded to the diagonal direction.
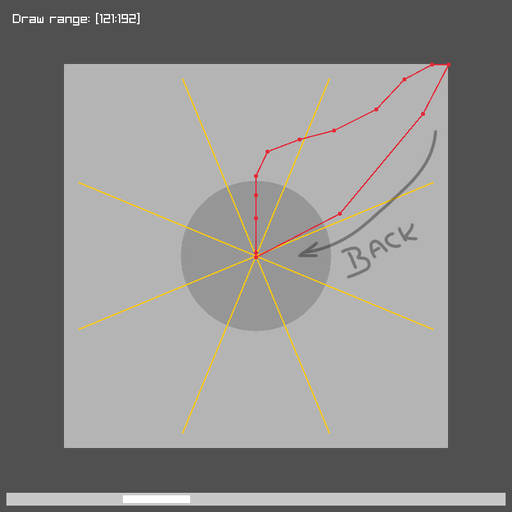
While testing the bindings I noticed that it was really hard to get a clean diagonal direction. Only very precise movements resulted in clean output. In order to better understand what’s going wrong I’ve written a small program that draws the stick position from a saved log file. I’ve used raylib for that. It’s a great small game engine/framework.
The image below shows the slice of the history/log in which I’ve moved the stick into a diagonal direction. The dark grey circle in the center represents the sticks deadzone. The blue color highlights the problem.
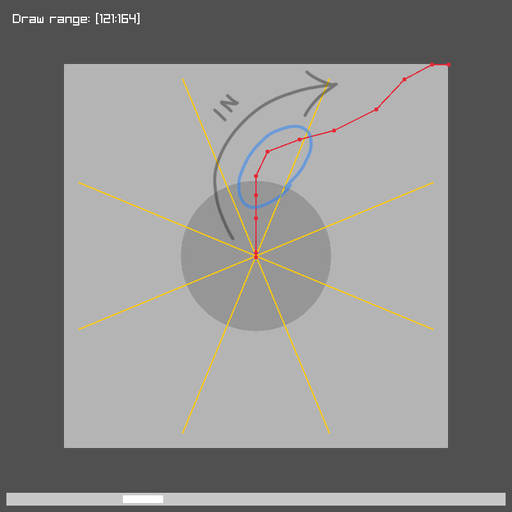
The stick exits the deadzone through the top segment active zone and then goes into the diagonal active zone… This happens often. Increasing the size of the deadzone helps a bit but it doesn’t solve the problem entirely. It happens that the path is extremely bad. Let say you want the stick hit the south east corner. You might see a path that first goes vertically south and then horizontally to the east. Increasing deadzone can’t fix that.
The stick returning the center should also be clean but that’s not as important since that’s something the controller does by itself.
It seems that the mechanics of the joystick result in a less than perfect output. It’s not a problem when playing games. It is when you try make a reliable and precise controller.