Black magic probe out of cheap STLink programmers
If you have ever worked with ARM Cortex M processors you’ve probably used GDB + OpenOCD combo for debugging. If you didn’t: OpenOCD connects to the processor via a STLink programmer and opens a socket to which GDB can connect. It will push data necessary for debugging (and understandable for GDB) through this socket. That means that if you connect GDB to this socket (so called remote debugging) you can debug processor’s software like any other application on your PC.
Usually you connect the microcontroller through the SWD interface pins to the STLink debugger/programmer which you then plug into your PC. Then you can start OpenOCD like so:
openocd -f interface/stlink-v2.cfg -f board/the_board.cfg \
        -c 'reset_config trst_and_srst'
By default all of the
OpenOCD’s scripts are stored in
/usr/share/openocd/scripts
(assuming you are running Linux and have installed
OpenOCD
through you package manager).
If you are developing for a specific board (Nucleo,
Discovery
or anything like
that) you can find scripts for that in
/usr/share/openocd/scripts/board
but
if you target a specific processor (and you can do that even if you are using
a development board) look in
/usr/share/openocd/scripts/target.
You also have to supply an interface script. Those are stored in
/usr/share/openocd/scripts/interface
(i.e. those programmers use the
stlink-v2.cfg).
Assuming OpenOCD connected fine, the next step is to connect GDB to the OpenOCD. Assuming default parameters it goes something like this:
arm-none-eabi-gdb --eval-command="target remote localhost:3333" firmware_binary.elfThis starts
GDB
with the binary that previously got flashed into processor’s memory
(GDB
isn’t running the binary but it needs it as an argument to read the debug symbols).
The
--eval-command
connects to the remote target on start. The
OpenOCD
runs
on the same machine and listens on the port 3333 (localhost:3333). At this
point you can start debugging with
GDB. That’s a bit of work to be able to step
through the code.
That’s where Black Magic Probe comes in. Imagine you can put everything I’ve describe above on the STLink programmer chip. You connect the STLink programmer to the micro controller and plug it into PC. You start GDB and you can step through the code. The whole OpenOCD part gets automated. That’s what Black Magic Probe does for you. It’s a STLink programmer/debugger with OpenOCD and GDB sessions on board.
The original creators of Black Magic Probe are BlackSphere Technologies. The project itself is open source. You can find it here. You can buy the Black Magic Probe board for around 60$. You can also make it for around 4$. This post is about making one. Take in consideration that buying one from an official distributor supports this project.
4$ magic <
The idea is to buy two STLink programmers and use one of them to flash the Black Magic Probe firmware onto the other one. You can get one of those for less than 2$.

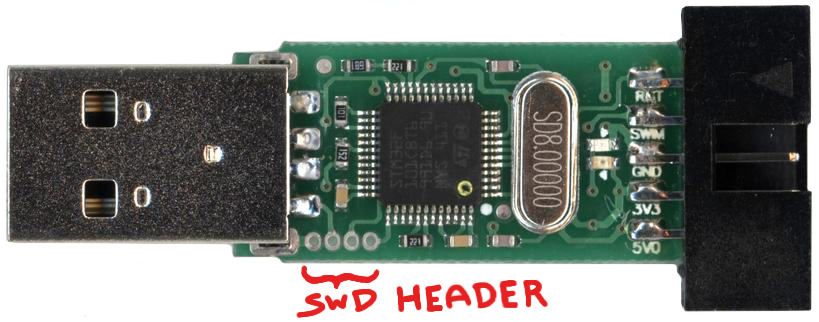
After you get them in your hands you’ll find you can easily slide the enclosure off. You’ll find that those programmers are using the STM32F101CBT6 microcontrollers. In the image below you can see the four vias in the bottom left corner of the pcb. That’s the SWD header which is used to flash the microcontroller. That basically means you can reflash this programmer and use it like a generic development board.
I’ve received some unique programmers… they didn’t have vias but pads and the pinout was different… It took a few minutes to figure out which pad is which pin of STLink SWD connector. I’ve cut the wires I got with the programmers (both ends were female Dupont) and soldered them to the pads.
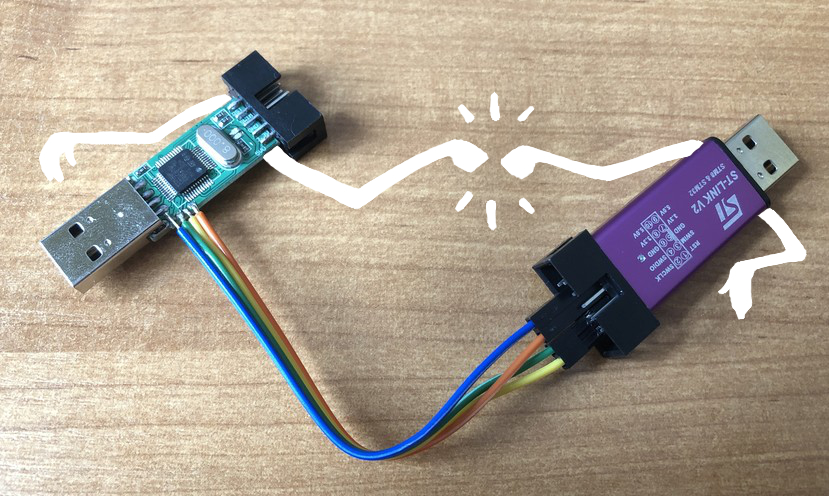
So at this point one of the dongles does what it’s meant to do - it’s a programmer and the second one is being operated on. Lets get the firmware source and start flashing.
git clone https://github.com/blacksphere/blackmagic.gitQuick build:
cd blackmagic
make
cd src
make clean
make PROBE_HOST=stlink
The firmware is based on libopencm3 - an open source low level hardware library for Cortex-M devices. Open source means transparent and that’s always a good thing. Especially when something goes wrong and needs debugging.
Before the programmer can be flashed, the memory needs to be unlocked for writing:
openocd -f interface/stlink-v2.cfg -f target/stm32f1x.cfg \
        -c "init; reset halt; stm32f1x unlock 0; reset halt; exit"
I have erased the programmer’s firmware (here, using the small utility - st-link):
st-flash eraseI’ve flashed the, previously built, binary of the DFU (Device Firmware Update) bootloader to the beginning of the flash memory. It allows for updating the actual Black Magic Probe firmware.
st-flash write blackmagic_dfu.bin 0x8000000The Black Magic Probe firmware gets written 8192 bytes further:
st-flash --reset write blackmagic.bin 0x8002000For me everything went smoothly. I could desolder the wires from the flashed
dongle and put it back into the enclosure. I’ve connected it to the Linux PC
and run
lsusb:
...
Bus 002 Device 003: ID 1d50:6018 OpenMoko, Inc. Black Magic Debug Probe (Application)
...
And with that output I knew I didn’t screw up completely… I also run
dfu-util -l
to
verify the
DFU
bootloader is being detected.
...
Found Runtime: [1d50:6018] ver=0100, devnum=5, cfg=1, intf=4, path="26-1", \
               alt=0, name="Black Magic Firmware Upgrade (STLINK)", serial="D6CE8AB1"
...
Well, this looks great!
For the final check I looked at
dmesg
output and verified that two serial
ports have been added to the
/dev
directory, after connecting the probe.
For me those were
ttyACM0
and
ttyACM1. Former is the one that
GDB
will connect to while the latter is the debug
UART.
In order to connect GDB to the proper port and the processor that I want to debug and control I run:
arm-none-eabi-gdb -ex "target extended-remote /dev/ttyACM0" binary.elf
(gdb) monitor swdp_scan
(gdb) attach 1
More Black Magic Probe commands can be found here. The wiki has a lot of great information so it’s worth going through it.
My next project involves some proper, low-level development on Cortex-M processor which means I’ll be able to play around with this new artifact. Can’t wait!
Update: I’ve been using the
Black Magic Probe
for some time now. Unfortunately
it is slightly less reliable than the usual
OpenOCD
+
GDB
combo. Sometimes
continuing after a break point locks the
GDB
- it just stops responding to commands
(even
CTRL+C
or
CTRL+D
signals). I find myself going back to the old way of doing
this. I still consider this project to be an interesting thing. I just don’t know if
it’s a professional tool that improves the workflow. Doesn’t seem like it.